Holdings
Your Holdings, Explained
A line-by-line view of every position you own - sortable, filterable, and exportable. This is the most detailed view of your portfolio on the platform.
Last updated
Welcome
The Holdings page is your master list. Every position across every connected account and manually-added asset shows up here, one row per holding. If a number on your dashboard ever looks off, this is where you come to investigate.
Unlike the dashboard, which aggregates and visualizes, this page is built for inspection - sort, filter, search, and export. Read on for how each piece works.
Before you start: If a holding is missing or miscategorized, you'll likely fix it from this page. Use the filters to narrow down, then click into any row to edit the holding's asset class, entity, or other details.
The top row
Four summary cards across the top give you the headline metrics for whatever you're currently viewing. If you apply a filter, these numbers update to reflect only the filtered set.
- Total Market Value - The combined current value of all holdings shown. This is your AUM for the visible set.
- Total Cost Basis - What you originally paid. For manual assets, this is the value you entered when you added them.
- Unrealized Gain/Loss - Market Value minus Cost Basis. The percentage shows the total return on the visible holdings. Green for gains, red for losses.
- Total Positions - A count of how many individual holdings are shown. Useful for confirming a filter is doing what you expect.
Filter to just Private Equity and the cards recalculate to show your private equity totals only. Clear the filters to see the full portfolio again.
The action bar
Three buttons sit at the top right.
- Add Holding - Manually add an asset that isn't in a connected account - real estate, private equity stakes, art, collectibles, or anything else. You'll enter the name, asset class, entity, cost basis, current value, and optional notes.
- Export - Downloads the currently visible holdings as a spreadsheet. If you've filtered, only the filtered set exports. Useful for sharing with your CPA or pulling into your own analysis.
- View Options - Lets you reorganize the table - show or hide columns, reorder them, and change column widths. Changes persist across sessions.
Search & filters
Just above the table you'll find a search field and a filter button. Use them together to drill down quickly.
Type any text - an asset name, ticker, account, or entity - and the table narrows to matching rows in real time. Search runs across every visible column.

Press the filter button and four dropdowns appear. Filters stack - selecting "Private Equity" and "DAS LLC" shows only private equity holdings inside DAS LLC.
- All Institutions - The source of the holding - a specific brokerage, custodian, wallet, or "Manual Account" for assets you've added yourself.
- All Asset Classes - Category - Real Estate, Public Equity, Private Equity, Digital Asset, Fixed Income, Uncategorized.
- All Accounts - The specific account within an institution. Useful if you have multiple accounts at the same custodian.
- All Entities - The legal entity that owns the holding - your trusts, LLCs, foundations, or "Unassigned" for holdings not yet linked to an entity.
After setting filters, the checkmark applies them and the X clears everything back to the full view. The X is the fastest way to reset when a filter combination returns nothing.
Sorting columns
Every column header is sortable. Click once to sort ascending, click again to sort descending. A small up/down arrow appears next to the active sort column.
- Sort by Market Value to find your largest positions.
- Sort by Day Change to see the biggest movers.
- Sort by Asset Class to group similar holdings together visually.
Filter to a single asset class and sort by Market Value descending - instant view of your top holdings in that category. Filter to one entity and sort by Day Change - instant view of what moved most inside that entity today.
Customizing the view
Click View Options in the top right to open the column manager.
- Hide columns you don't use - if you never look at Day Change, turn it off and the table breathes.
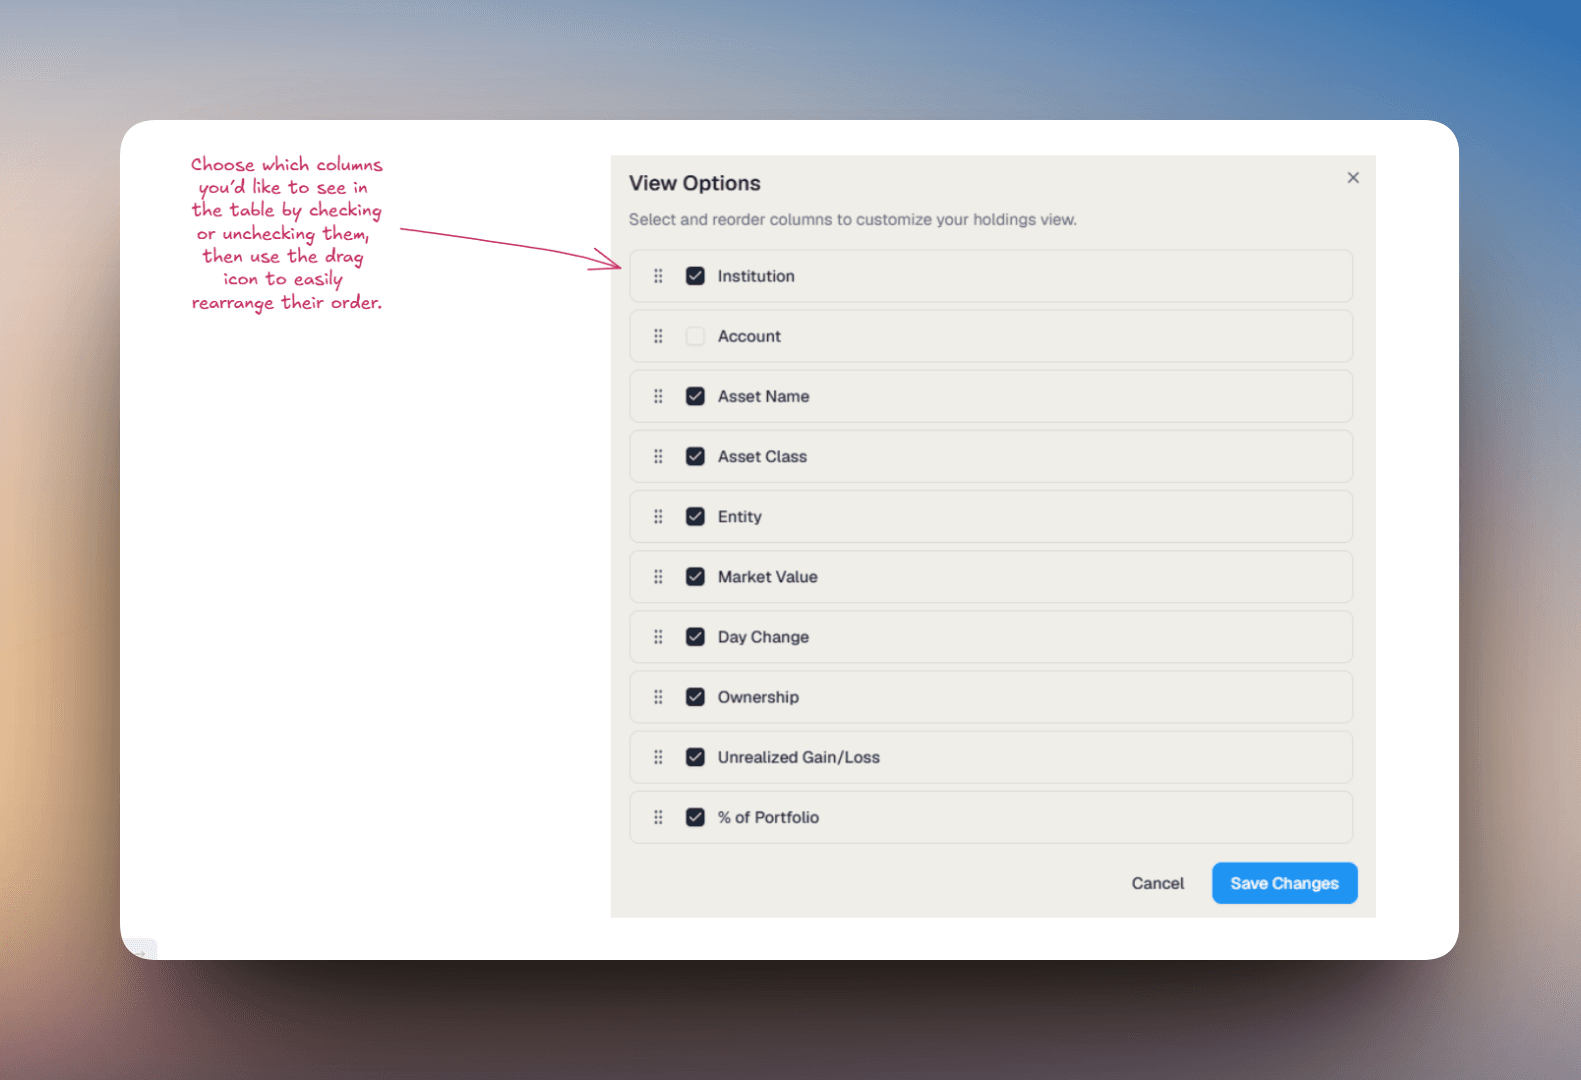
- Reorder columns by dragging - put the columns you care about most on the left.
- Resize columns by dragging the dividers in the header row.
Your customizations persist across sessions and devices, so the table looks the same next time you sign in.
Adding a manual holding
Manual holdings allow you to track investments and assets that are not synced through connected financial accounts.
This is commonly used for:
- Privately managed investments
- Manually tracked securities
- Private market positions
- Digital assets
- Liabilities
- Other off-platform holdings
To create a manual holding:
Navigate to the Holdings page.
Click + Add Holding.
Select the type of holding you want to create.

Adding a Public Equity Holding
Public Equity holdings can be used to manually track stocks and publicly traded securities that are not connected through a brokerage account.
Step 1 - Open the Public Equity Dialog
From the Add Holding menu, select Public Equity.
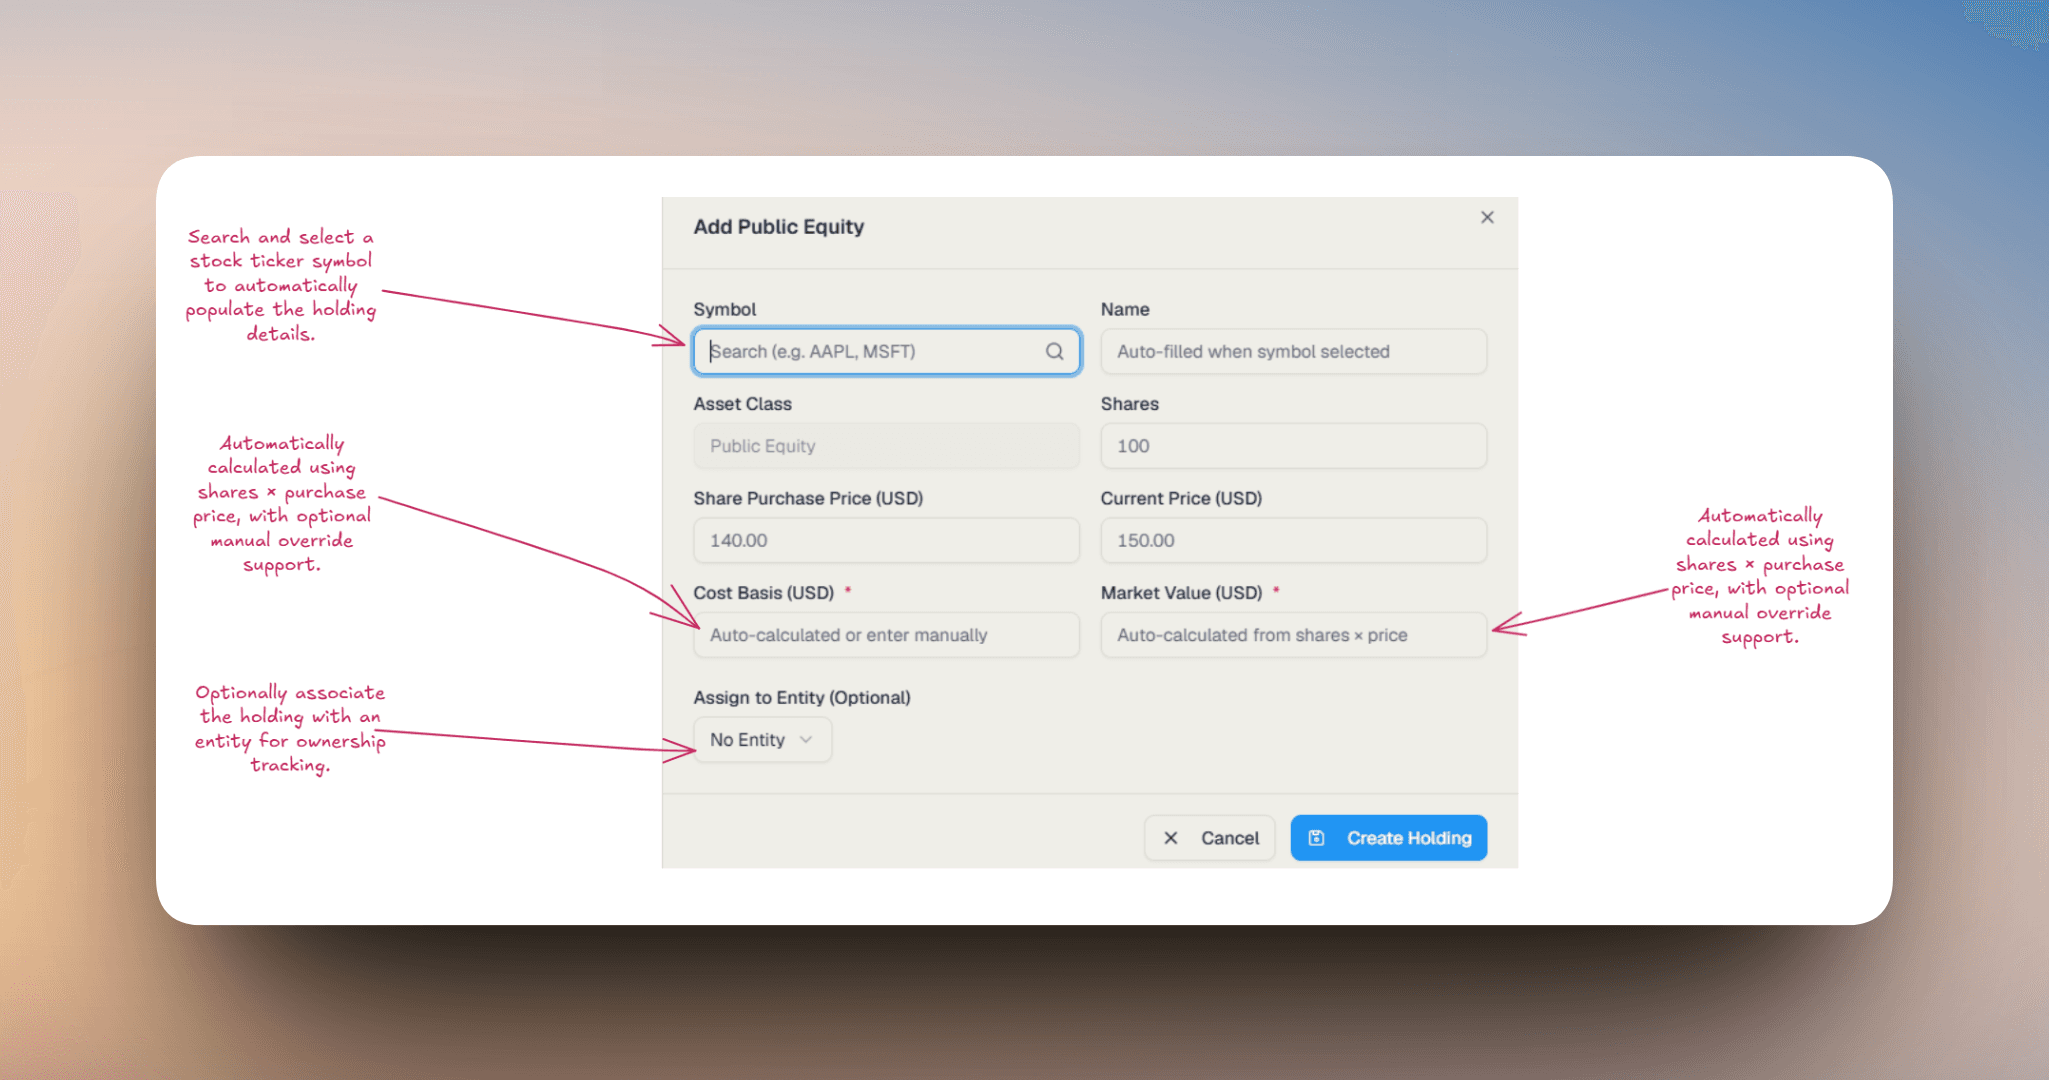
Step 2 - Enter Holding Details
Fill in the required holding information.
Symbol
Search and select the stock ticker symbol (for example: AAPL or MSFT). The platform automatically fills in the company name after selecting a symbol.
Shares
Enter the total number of shares owned.
Share Purchase Price
Enter the original purchase price per share. This is used to calculate the holding's cost basis and performance metrics.
Current Price
Enter the latest market price per share. This is used to calculate the current market value of the holding.
Cost Basis
Automatically calculated as shares × purchase price. You can also manually override the value if needed.
Market Value
Automatically calculated as shares × current price. This value contributes to portfolio allocation and reporting calculations.
Assign to Entity
Optionally assign the holding to an entity such as a trust, LLC, foundation, or investment vehicle. This helps organize ownership structures and consolidated reporting.
Create Holding
Click Create Holding to save. The holding will appear in your Holdings table immediately.
Adding a Hedge Fund Holding
Hedge Fund holdings can be used to manually track alternative investments, fund allocations, liquidity terms, fee structures, and performance-related information that may not be available through connected accounts.
To add a hedge fund holding, click + Add Holding and select Hedge Fund.
Step 1 - Open the Hedge Fund Dialog
After selecting Hedge Fund, the creation dialog will open.
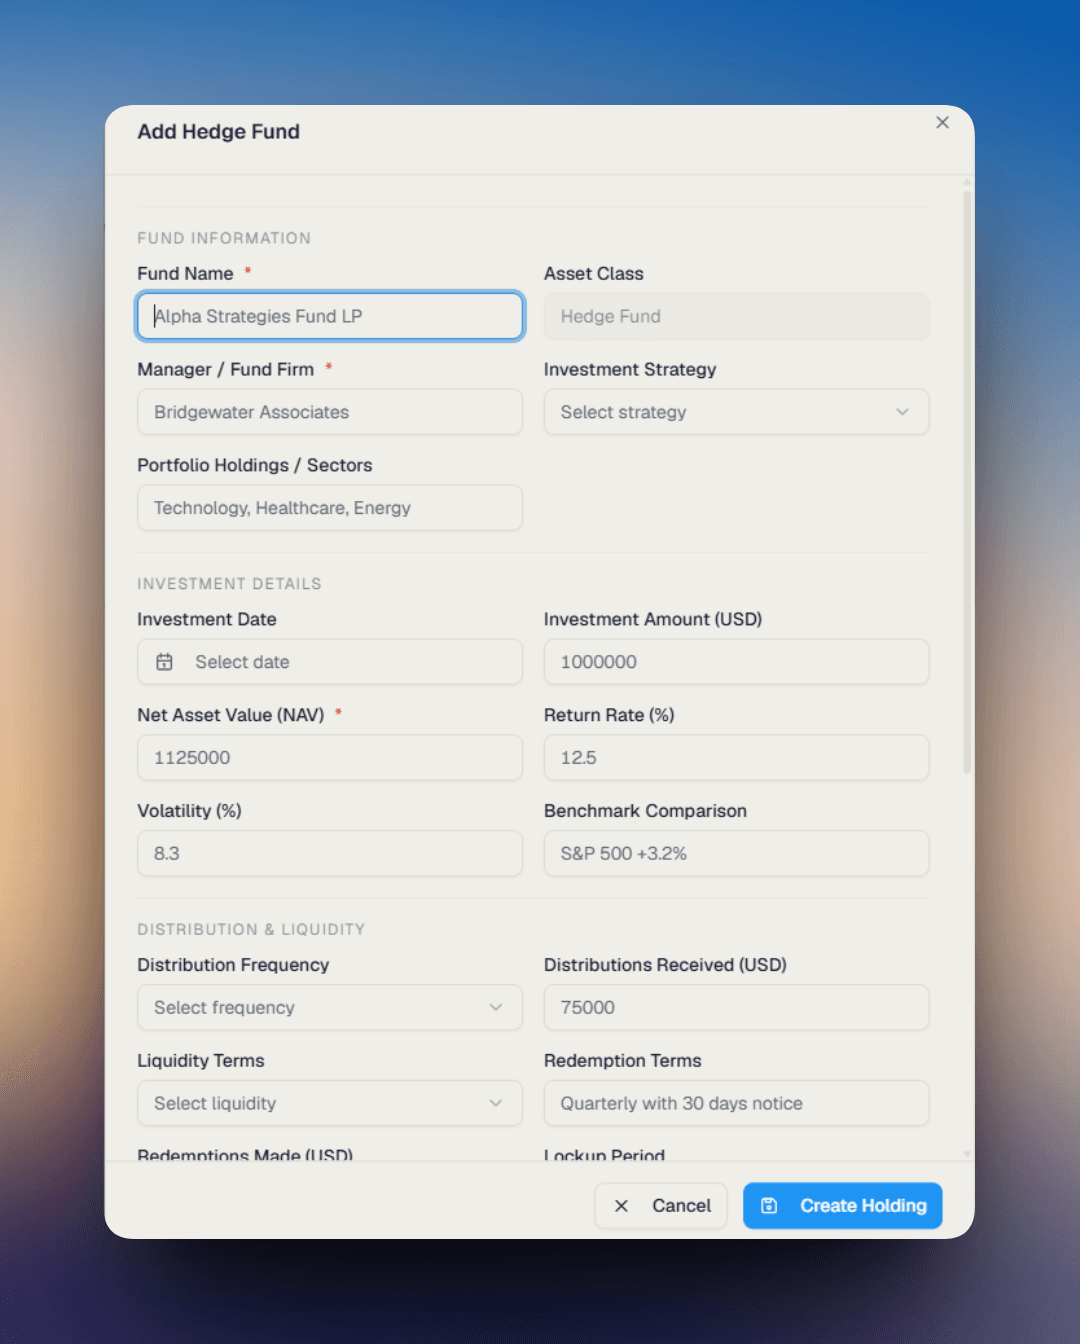
This form allows you to capture both portfolio valuation details and operational fund terms used for reporting and investment tracking.
Step 2 - Enter Fund Details
Fill in the required hedge fund information.
Volatility (%)
Represents the fund's historical or estimated volatility. This can help contextualize risk and performance behavior within the portfolio.
Benchmark Comparison
Reference benchmark performance used to compare fund returns. Examples: S&P 500, MSCI World, or a custom benchmark.
Distribution Frequency
Defines how often distributions are paid to investors. Examples: Monthly, Quarterly, Annually.
Distributions Received
Tracks total distributions received from the investment.
Liquidity Terms
Defines how frequently investors are allowed to redeem capital.
Redemption Terms
Additional redemption restrictions or notice requirements. Example: Quarterly with 30 days notice.
Redemptions Made
Tracks total capital redeemed from the investment.
Lockup Period
Defines the required holding period before redemptions are permitted.
Management Fee (%)
Annual management fee charged by the fund.
Performance Fee (%)
Performance-based incentive fee charged on gains.
Tax Documents
Optional reference for associated investor tax documents. Examples: Schedule K-1, fund statements, tax summaries.
Notes & Strategy Updates
Use this section to track strategy changes, investment commentary, risk considerations, manager updates, and operational notes.
Step 3 - Assign to Entity
Optionally associate the holding with a trust, LLC, or family office entity. This helps maintain accurate ownership structures and consolidated reporting.
Step 4 - Create the Holding
After entering the required information, click Create Holding. The holding will immediately appear in holdings reporting, allocation summaries, entity-level reporting, and portfolio calculations.
Adding a Liability / Debt Holding
Liability and Debt holdings can be used to manually track obligations such as:
- Mortgages
- Credit cards
- Personal loans
- Lines of credit
- Auto loans
- Other outstanding liabilities
These holdings help provide a more complete view of net worth, cash flow obligations, and portfolio exposure.
To add a liability or debt holding, click + Add Holding and select Liability / Debt.
Step 1 - Open the Liability / Debt Dialog
After selecting Liability / Debt, the creation dialog will open.
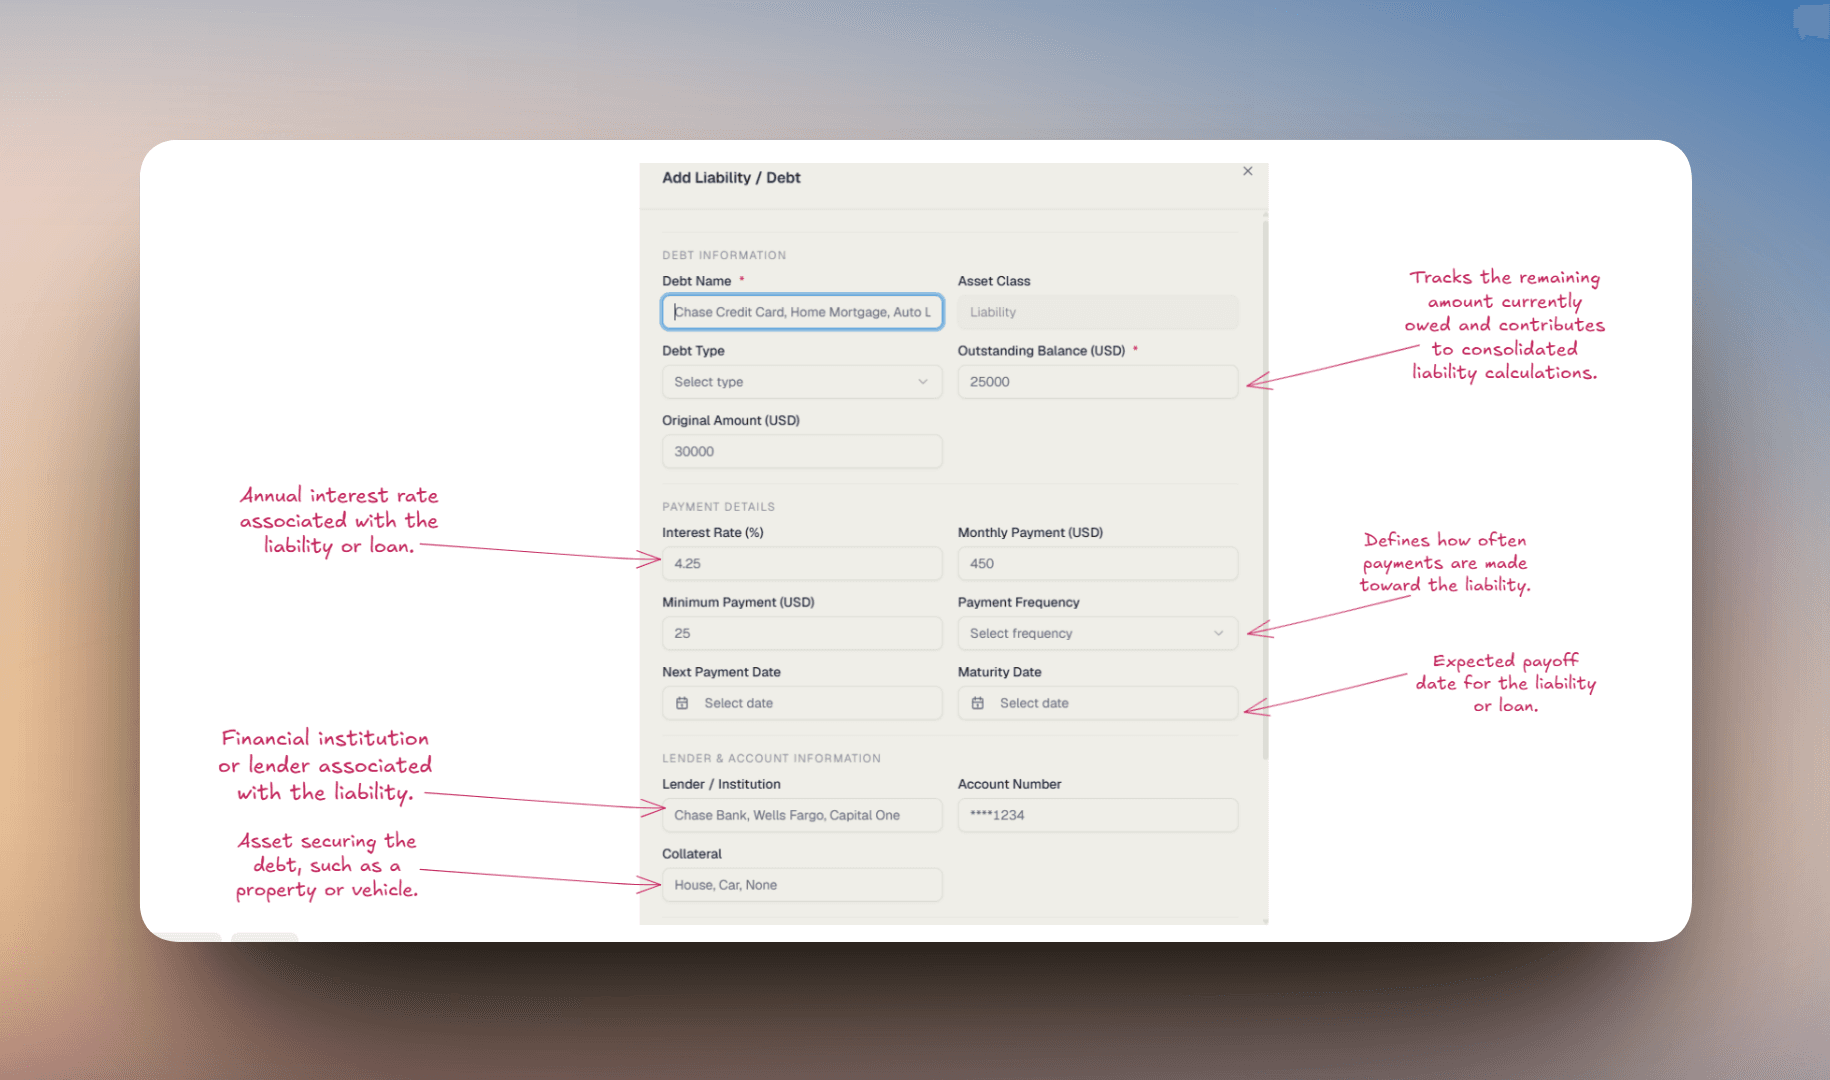
This form allows you to track debt balances, payment schedules, lender information, and maturity details.
Step 2 - Enter Debt Information
Fill in the required debt details.
Debt Name
Enter a recognizable name for the liability. Examples: Chase Credit Card, Home Mortgage, Auto Loan.
Debt Type
Select the type of liability being tracked. Examples: Mortgage, Credit Card, Personal Loan, Line of Credit.
Outstanding Balance
The remaining balance currently owed. This value contributes to consolidated liability and net worth calculations.
Original Amount
The original principal or starting balance of the debt.
Interest Rate (%)
Annual interest rate associated with the liability.
Monthly Payment
Recurring payment amount made toward the debt.
Minimum Payment
Minimum required payment amount.
Payment Frequency
Defines how often payments are made. Examples: Monthly, Quarterly, Bi-weekly.
Next Payment Date
Upcoming scheduled payment date.
Maturity Date
Date when the liability is expected to be fully paid off.
Lender / Institution
Financial institution or lender associated with the liability. Examples: Chase, Wells Fargo, Capital One.
Account Number
Optional reference for the associated account.
Collateral
Asset securing the debt, if applicable. Examples: House, Vehicle, None.
Assign to Entity
Associate the liability with a trust, LLC, or family office entity. This helps maintain accurate ownership structures and consolidated net worth reporting.
Step 3 - Create the Liability
After entering the required information, click Create Holding. The liability will immediately appear in holdings reporting, net worth calculations, and entity-level reporting.
Adding a Digital Asset Holding
Digital Asset holdings can be used to manually track cryptocurrencies and blockchain-based assets that are not connected through supported wallets or exchanges.
This includes:
- Bitcoin
- Ethereum
- Stablecoins
- Manually managed wallets
- DeFi positions
- Other blockchain assets
To add a digital asset holding, click + Add Holding and select Digital Asset.
Step 1 - Open the Digital Asset Dialog
After selecting Digital Asset, the creation dialog will open.
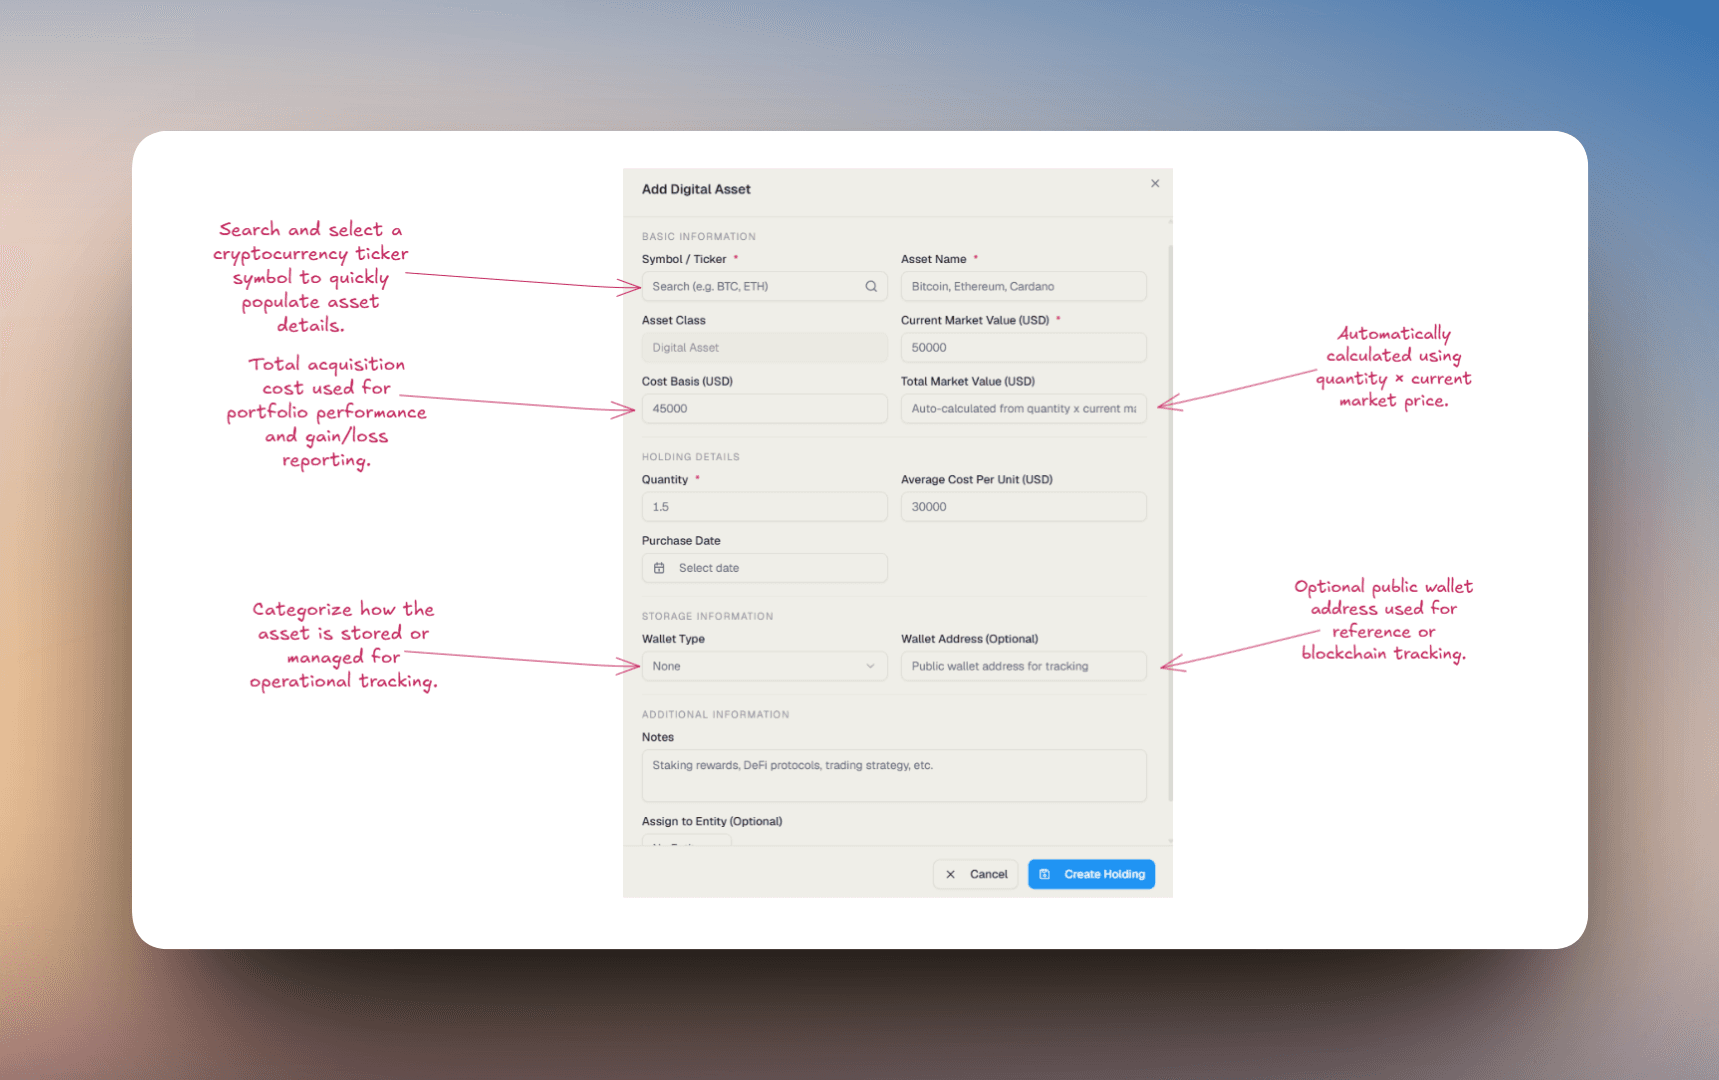
This form allows you to track token balances, valuations, wallet information, and additional crypto-related details.
Step 2 - Enter Asset Information
Fill in the required digital asset details.
Symbol / Ticker
Search and select the cryptocurrency ticker symbol. Examples: BTC, ETH, ADA.
Asset Name
Name of the selected digital asset. The platform may automatically populate this after selecting a ticker symbol.
Current Market Value
Current market price per unit of the asset. Used to calculate the total market value of the holding.
Cost Basis
Total acquisition cost associated with the holding. Used for portfolio performance and gain/loss calculations.
Total Market Value
Automatically calculated as quantity × current market value. This value contributes to portfolio allocation and reporting calculations.
Quantity
Total amount of the digital asset currently owned.
Average Cost Per Unit
Average acquisition cost per token or coin.
Purchase Date
Date the position was originally acquired.
Wallet Type
Optional wallet classification. Examples: Hardware Wallet, Exchange Wallet, Custodial Wallet, Cold Storage.
Wallet Address
Optional public wallet address used for tracking or reference purposes.
Notes
Use this section to track staking rewards, DeFi activity, trading strategies, protocol participation, and operational notes.
Step 3 - Assign to Entity
Optionally associate the holding with a trust, LLC, family office entity, or investment vehicle. This helps maintain accurate ownership structures and consolidated reporting.
Step 4 - Create the Holding
After entering the required information, click Create Holding. The holding will immediately appear in portfolio allocation reporting, holdings summaries, entity-level reporting, and consolidated net worth calculations.
Adding a Cash & Cash Equivalents Holding
Cash & Cash Equivalent holdings can be used to manually track liquid assets and cash positions that are not connected through synced financial accounts.
This may include:
- Cash balances
- Reserve funds
- Money market holdings
- Treasury positions
- Operational cash accounts
- Manually tracked liquidity balances
To add a cash holding, click + Add Holding and select Cash & Cash Equivalents.
Step 1 - Open the Cash Holding Dialog
After selecting Cash & Cash Equivalents, the creation dialog will open.
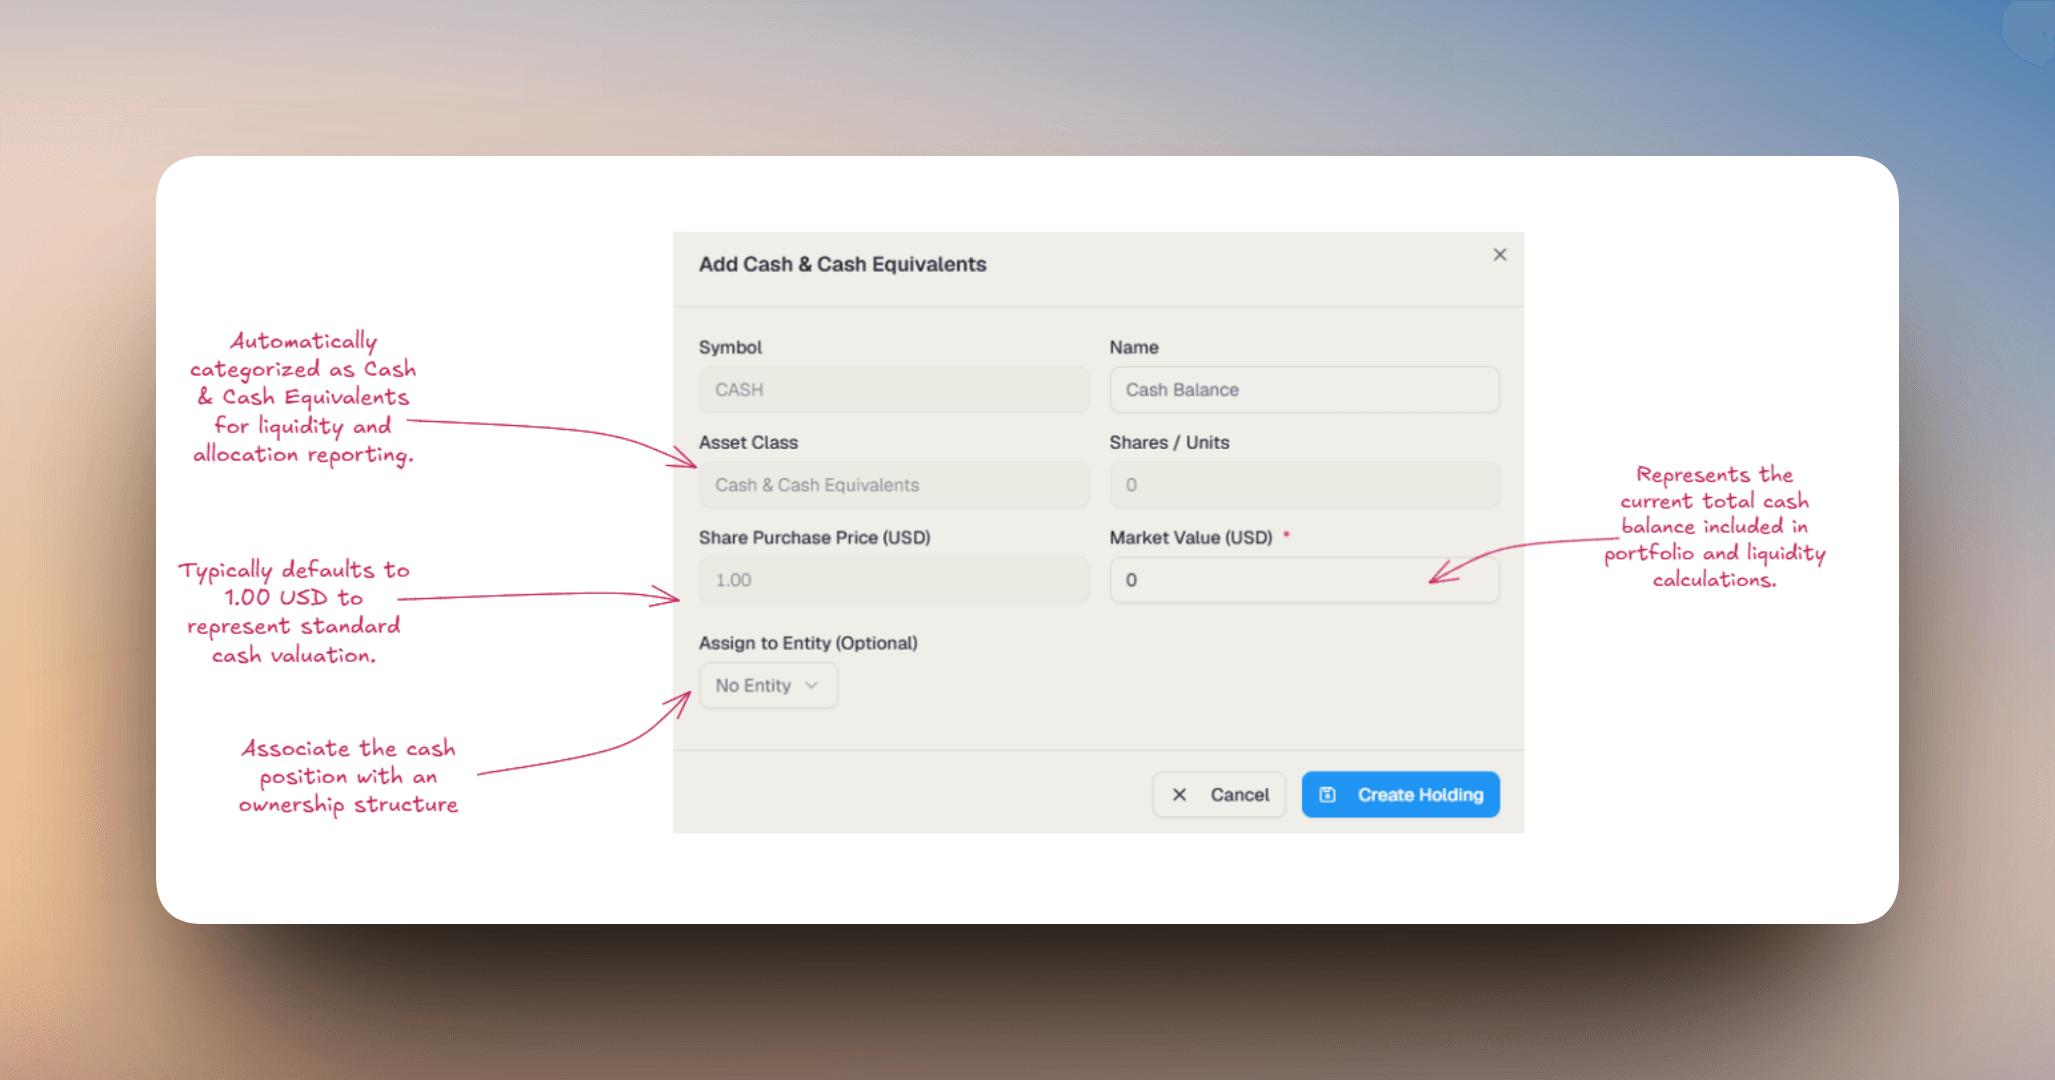
This form allows you to manually track cash balances and liquidity-related holdings within your portfolio.
Step 2 - Enter Cash Holding Details
Fill in the required cash holding information.
Symbol
Predefined identifier used for the cash position.
Name
Display name for the cash holding. Examples: Cash Balance, Operating Cash, Reserve Account.
Asset Class
Automatically categorized as Cash & Cash Equivalents. This ensures the holding appears correctly in allocation and liquidity reporting.
Shares / Units
Represents the quantity or units associated with the cash position.
Share Purchase Price
Typically defaults to 1.00 USD. Used for valuation consistency within reporting calculations.
Market Value
Current total value of the cash position. This value contributes directly to liquidity calculations, portfolio allocation, and consolidated net worth reporting.
Step 3 - Assign to Entity
Optionally associate the holding with a trust, LLC, family office entity, or investment vehicle. This helps maintain accurate ownership structures and consolidated reporting.
Step 4 - Create the Holding
After entering the required information, click Create Holding. The holding will immediately appear in portfolio allocation reporting, liquidity summaries, entity-level reporting, and consolidated net worth calculations.
Export Holdings
The Export Holdings feature allows you to download holdings data for external analysis, reporting, operational workflows, or record keeping.
Exports can be customized using:
- Export format selection
- Institution filters
- Account filters
- Asset class filters
- Entity filters
To export holdings, open the Export Holdings dialog from the Holdings page.
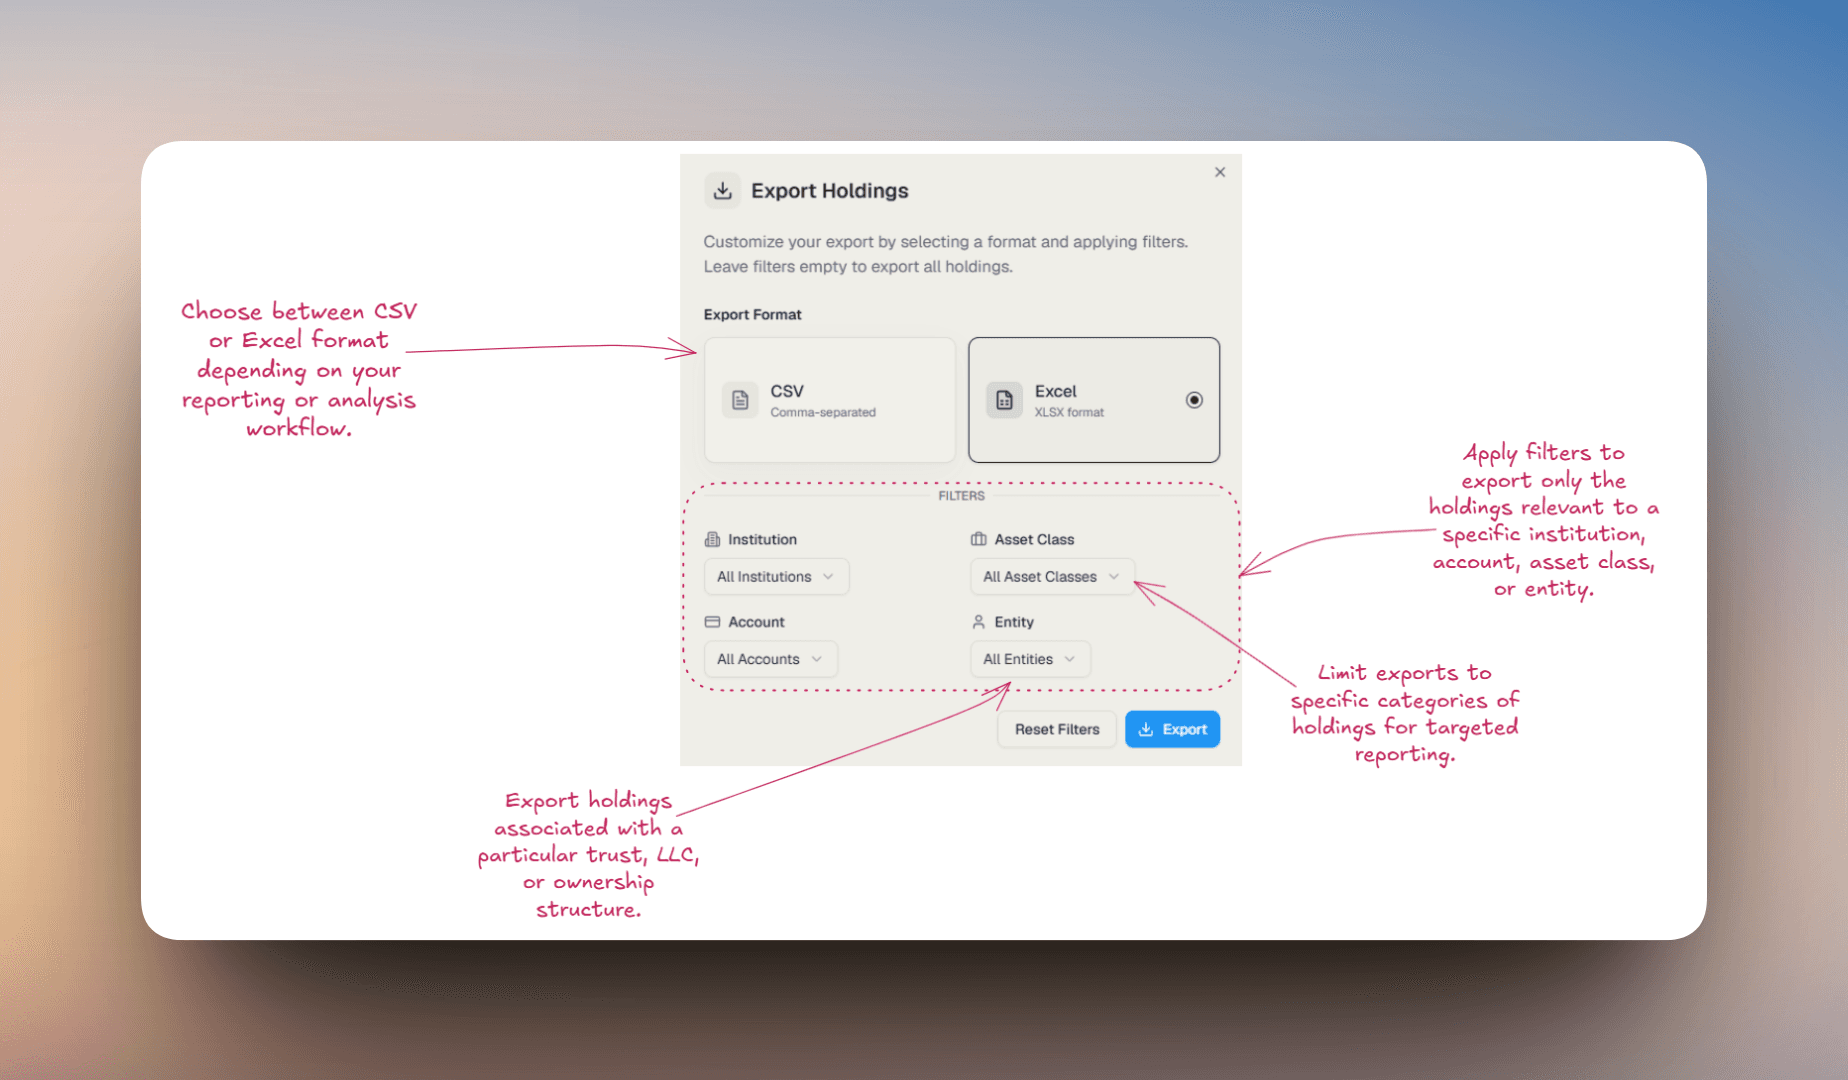
Step 1 - Select an Export Format
Choose the format you want to export.
CSV
Exports holdings data in a comma-separated format compatible with spreadsheets, reporting tools, data imports, and custom analysis workflows.
Excel
Exports holdings data as an XLSX spreadsheet for structured reporting and offline analysis.
Step 2 - Apply Filters
Optionally apply filters to export only specific holdings.
Institution
Filter holdings by financial institution or provider.
Account
Export holdings from selected accounts only.
Asset Class
Limit exports to specific asset categories. Examples: Public Equity, Digital Assets, Cash & Cash Equivalents, Hedge Funds.
Entity
Export holdings associated with specific entities or ownership structures. This is useful for family office reporting, trust-level reporting, LLC-specific reporting, and entity-based reconciliation.
If no filters are applied, all holdings will be included in the export.
Step 3 - Export Holdings
After selecting a format and applying filters, click Export.
The platform will generate and download the holdings export file.